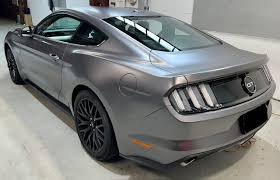
How to install a Grey Vinyl Wrap at home

Vinyl wrapping your vehicle is an excellent way to give it a fresh, sleek look without committing to a permanent paint job. Grey Vinyl Wrap, in particular, are a popular choice for their modern and sophisticated appearance. While professional installation is always an option, you can save money and enjoy the satisfaction of doing it yourself by installing the wrap at home. Below is a step-by-step guide to help you successfully apply a grey vinyl wrap to your vehicle.
---
"Materials and Tools You'll Need"
Before you start, make sure you have the following materials and tools ready:
- Grey vinyl wrap (enough to cover your vehicle or desired surface)
- Squeegee or application tool
- Heat gun or hairdryer
- Utility knife or precision blade
- Cleaning supplies (soap, water, and microfiber cloths)
- Isopropyl alcohol
- Masking tape
- Measuring tape
- Gloves (optional but recommended)
- A friend or helper (optional, but can make the process easier)
---
"Step 1: Prepare Your Vehicle"
Proper preparation is key to achieving a smooth and long-lasting vinyl wrap installation. Follow these steps to prep your vehicle:
1. "Clean the Surface:" Wash your car thoroughly with soap and water to remove dirt, grease, and debris. Pay special attention to edges, crevices, and seams.
2. "Dry Completely:" Use microfiber cloths to dry the surface completely. Any moisture left behind can interfere with the adhesive.
3. "Degrease:" Wipe down the surface with isopropyl alcohol to remove any remaining grease or residues.
4. "Remove Obstacles:" If possible, remove door handles, mirrors, and trims to make wrapping easier. Mask off areas you don’t want to wrap using masking tape.
---
"Step 2: Plan and Measure"
1. "Measure the Vinyl:" Measure each section of your vehicle and cut the vinyl wrap into appropriately sized pieces, leaving an extra 2-3 inches on all sides for adjustments.
2. "Plan Your Application:" Decide which sections to wrap first. It’s often best to start with flat surfaces like the hood or roof before moving on to more complex areas like bumpers.
---
"Step 3: Apply the Vinyl Wrap"
1. "Position the Vinyl:" Peel off a small portion of the backing paper and position the vinyl on the surface. Use masking tape as a guide if necessary.
2. "Apply Gradually:" Slowly peel off more of the backing paper while smoothing the vinyl onto the surface with your squeegee. Work from the center outward to avoid air bubbles.
3. "Use Heat for Curves:" For curved or irregular surfaces, use a heat gun or hairdryer to make the vinyl more pliable. Gently stretch and press it into place.
4. "Smooth Out Bubbles:" If air bubbles form, use your squeegee to push them toward the edges. For stubborn bubbles, use a pin or blade to release the trapped air.
---
"Step 4: Trim and Finish"
1. "Trim Excess Vinyl:" Once the vinyl is fully applied, use a utility knife or precision blade to trim away excess material along edges and seams.
2. "Seal Edges:" Press down firmly on all edges and seams to ensure proper adhesion.
3. "Finalize with Heat:" Use your heat gun to go over the entire wrapped surface one last time. This helps activate the adhesive and ensures a snug fit.
---
"Step 5: Inspect Your Work"
After completing the installation, take a step back and inspect your work for any imperfections. If needed, reheat and adjust areas that may have wrinkles or bubbles.
---
"Tips for Success"
- Work in a clean, dust-free environment to avoid debris getting under the vinyl.
- Take your time—rushing can lead to mistakes.
- If you’re new to vinyl wrapping, practice on smaller sections or less visible areas first.
- Don’t hesitate to ask a friend for help when working on larger panels.(Matte Car Wraps)
---
Installing a grey vinyl wrap at home may seem intimidating at first, but with patience and careful preparation, you can achieve professional-looking results. Not only will your vehicle look stylish and refreshed, but you’ll also have the satisfaction of knowing you did it yourself. Follow this guide step by step, and soon enough, you’ll be cruising in your newly wrapped ride!


